
Concrete walls are known for their durability and strength, but when it comes to hanging art, they can feel more like obstacles than assets. If you’re looking to decorate your home like a pro but you have concrete walls to content with, the right tools and techniques can turn this challenging surface into a perfect backdrop for your artwork. Whether you’re dealing with lightweight pieces or heavy frames, this how-to guide on hanging art on concrete walls will be with you through every step of the process.
7 Tips for Hanging Art on a Concrete Wall
- The best way to hang art on concrete walls depends mainly on how heavy the art is.
- Always clean and inspect the wall surface before you hang pictures to prevent dust interference and/or ensure proper adhesion.
- Use a hammer drill with carbide masonry bits to drill into concrete walls effectively.
- Select wall anchors and screws designed specifically for concrete to provide stability.
- For lightweight art, adhesive hooks or strips can be a non-invasive solution.
- Always use a level for straight alignment and follow standard height guidelines for an optimal display.
- Much like brick walls, it’s more difficult to patch concrete walls than drywall, so always double-check your measurements before committing.
Understanding the Challenges of Concrete Walls
Concrete walls are much tougher to work with than drywall or wood, so traditional hanging methods like nails won’t suffice. The hardness of the material means you’ll need specialized tools and hardware. It’s also worth noting that concrete often has layers of plaster or uneven surfaces to deal with, which can further complicate drilling and hanging wall art.
To overcome these challenges, it’s essential to:
- Use heavy-duty anchors and concrete screws explicitly designed for concrete.
- Mark your drill points carefully to avoid hidden wires or other obstacles.
- Start drilling at the lowest speed so you can quickly stop if you seem to be hitting a pipe.
- Thoroughly clean and inspect the wall surface to ensure a secure fit for hardware or adhesive solutions.
Tools and Materials to Hang Things on Concrete
Before you start, gather these essential tools and materials:
- Soft cloth and rubbing alcohol to clean the wall surface. Cloth is more effective than paper towels.
- Level to ensure straight alignment.
- Tape measure for precise spacing and placement.
- Pencil for marking drill points.
- Adhesive hooks or strips for lightweight pieces, no drill or other hardware necessary.
- Masonry screws and anchors for medium to heavy artwork.
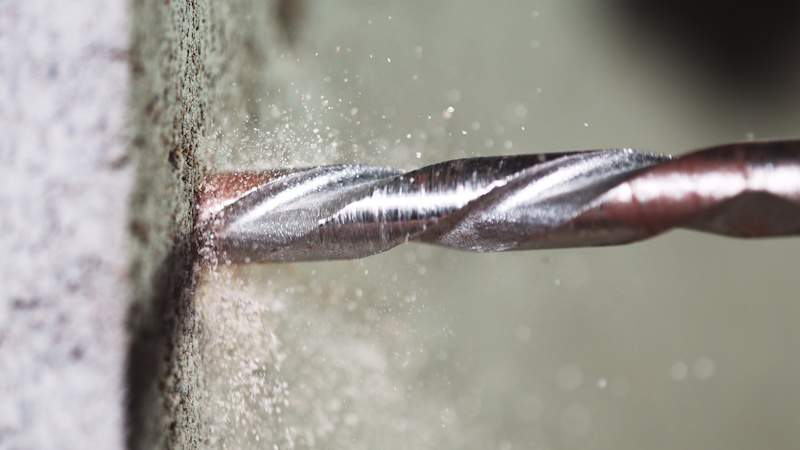
- Hammer drill with carbide masonry drill bits for drilling into concrete. A normal power drill can also work, but it will be tough on the tool and take significantly more time and effort.
- Safety gear like protective eyewear and dust masks to shield against debris.
Choosing the Right Hanging Method
Your hanging method will depend on the size and weight of your artwork:
Adhesive Wall Hooks or Strips
Adhesive strips like Command products are ideal for pieces under 6 lbs. They’re easy to install and remove without damaging the wall, which is great if you ever plan on rearranging. This is one of the top ways to hang pictures without nails.
Hardwall Hangers
These look a bit like an electrical plug with a hook on it. The “prongs” are actually built-in nails designed for hard wall surfaces like brick and concrete. Best of all, they don’t require drilling—only a hammer. Depending on the hanger’s rating, these are suitable for medium-weight pieces (15–30 lbs).
Masonry Screws and Anchors
Also known as concrete screws, masonry screws are much stronger than wood screws. However, they do need a pre-drilled guide hole before being installed. They’re best for heavy artwork or valuable pieces, supporting up to 50 lbs or more.
Non-Drilling Hanging Systems
Systems like STAS picture rails offer flexible, damage-free hanging once the rail has been installed. They provide a place for hooks to latch, allowing you to hang frames on cords without damaging the concrete wall. This is great for gallery walls or frequently changing displays.
Weight and Stability Considerations
- Lightweight Art (<6 lbs): Adhesive hooks or strips are sufficient.
- Medium-Weight Art (6–30 lbs): Use hardwall hangers or masonry anchors.
- Heavy Art (>30 lbs): Drill into the concrete and use multiple anchors for added stability.
Check your artwork periodically to ensure it remains secure, especially in environments with fluctuating temperature or humidity.
Preparing the Wall
You’ll want to properly prepare your concrete wall for the best chance of a successful installation. Debris can interfere with a drill bit’s function, causing friction, heat buildup, and clogging, all of which can result in slower drilling and even damage to the tool. If you’re using an adhesive hook, dust will interfere with adhesion, risking your wall art falling off the wall.
- Clean the Wall: Wipe the surface with a damp cloth to remove dust and dirt. Rubbing alcohol or other cleaners may be helpful.
- Measure and Mark: Use a tape measure and pencil to mark the placement of your art. For optimal viewing, use the 57 rule: aim for the center of your artwork to be 57–60 inches from the floor.
- Inspect for Cracks: Check for structural issues that might compromise stability.
- Test for Obstacles: Use a stud finder to identify hidden wires or pipes before drilling.
Installing Hanging Hardware
Installing Adhesive Hooks and Strips
For lightweight artwork, adhesive hooks offer a simple and damage-free solution:
- Clean and dry the wall surface thoroughly before application. Any residue or dust will interfere with adhesion.
- Peel the backing off the adhesive strip and press the adhesive side firmly onto the wall.
- Press firmly on the strip or hook for at least 30 seconds.
- Wait the recommended amount of time before hanging your art to ensure the adhesive is fully set.
- If the frame’s preexisting hanging hardware interferes with its flush attachment to the wall, consider removing it.
Installing Hardwall Hangers
Hardwall hangers can be a more secure option for lightweight art if you don’t mind small holes, and they can hold more weight than adhesive wall hooks. They’re great options for canvas or framed prints and artwork.
- Hold the back side of the hook firmly against the wall.
- Use a hammer to drive all the pins into the wall simultaneously.
- Stop hammering once the pins are flush with the hanger. Over-hammering will loosen the pins, making the hook less secure.
Drilling for Masonry Screws

For heavier art pieces, follow these steps:
- Use a pencil to mark the exact spots for your screws. Always double-check these; it’s a hassle to patch holes in concrete if you make a mistake with your measurements.
- Use a hammer drill with a masonry bit to create guide holes 1–1.5 inches deep in the concrete block. The hole should be at least a quarter-inch to half an inch deeper than the screw length, as these hard screws are also brittle and will break if they bottom out. The screw itself needs to be embedded at least an inch into the concrete to be secure. Drill slowly to avoid overheating the bit.
- During and immediately after drilling, blow dust out of the hole with a can of compressed air or a vacuum.
- Push wall anchors into the drilled holes—you may need to use epoxy or another adhesive depending on the type of anchor. Some masonry screw brands like Tapcon don’t require these, so be sure to check manufacturer recommendations.
- Drive the screws into the anchors, leaving about 1/8 inch exposed for hanging.
- Place your artwork on the screws and ensure it is level.
Finalizing Placement
After securing your art or wall décor, step back and evaluate its placement. Use a level to confirm straight edges, particularly for multi-piece arrangements. If you’re hanging multiple pieces in a gallery wall, re-measure after hanging each piece to maintain consistent spacing, typically 1–3 inches between pieces.
If any adjustments are needed, make them carefully to avoid damaging the wall or hardware.
Hang Pictures on Concrete with Confidence
Hanging art on concrete walls doesn’t have to be intimidating. With the right tools, preparation, and techniques, you can confidently display your favorite pieces knowing they’re secure. After choosing your wall art, select the appropriate method based on the weight of your art, prepare the wall properly, and take your time during installation to ensure a polished and professional result. By following these steps, you’ll create a stunning art display that enhances your space and reflects your style.