
A gallery wall is a curated arrangement of artwork, photos, or decorative items displayed on a single wall. In other words, it’s one of the best ways to express your personality and interests when decorating your home. With a few simple techniques, you can transform a blank wall into a captivating showcase of your unique style. Follow this step-by-step guide for creating a stylish gallery wall.
How to Design a Gallery Wall in 8 Steps
- Choose a Location: Whether you’re decorating your bedroom or the living room, select a wall space that fits the size and style of your envisioned gallery.
- Select a Theme: Decide on a cohesive theme, such as color palette, subject matter, or frame style, to unify the display.
- Gather Artwork & Items: Collect a variety of art pieces, photographs, mirrors, or other decor that fit your theme and desired aesthetic.
- Plan the Layout: Lay the pieces on the floor to experiment with arrangements, or use paper templates to map out the design directly on the wall.
- Start with a Focal Point: Begin with a central piece and build outward, balancing sizes and shapes for visual harmony.
- Measure & Mark: Use a tape measure, level, and pencil to mark where each piece will go on the wall.
- Hang Pieces Securely: Use nails, picture hooks, or adhesive strips, depending on the weight of each piece and the wall type.
- Adjust & Finalize: Step back to assess the overall look, making minor adjustments for spacing or alignment as needed.
Tools and Materials Checklist
Before diving into your gallery wall project, gather the right tools and materials to make the process smooth and stress-free. Here’s a quick checklist of essentials:
- Measuring tape: For precise placement and spacing.
- Level: To ensure your frames hang straight.
- Masking tape: For marking layout boundaries or simulating frame placement.
- Paper templates: Cut-outs the size of your frames for planning.
- Adhesive strips or hooks: Damage-free options for hanging.
- Hammer and nails: For a traditional hanging method.
- Pencil and eraser: For marking spots on the wall.
- Frames and art pieces: Ensure they’re clean and ready to hang.
How to Choose the Right Wall
You can build out a gallery on any wall. However, the size and shape of the wall will dictate how you choose wall art for your gallery. Ideally, choose a wall that has enough space to accommodate the size of your desired arrangement without feeling cramped or overwhelming. If you’re adding a gallery cluster around an existing piece, you’re off to a great start.
If you’re starting from scratch, high-traffic areas like living rooms, hallways, staircases, or even above a bed or sofa are popular choices because they get a lot of attention. You’ll also want to find an area with good natural or artificial light that enhances the display.
Define Your Gallery Wall Style
Like all creative pursuits, it’s best to start designing your gallery wall with a vision.
Start by considering the overall aesthetic you want to achieve. It may change along the way, but you’ll at least be organized at the start. Your aesthetic may be driven by the color scheme, frame styles, and types of art pieces you want to include. Or, you may want to focus your aesthetic on a theme, such as a collection of family photos, particular styles of artwork, or memorabilia.
Gather inspiration from various sources, such as interior design magazines, social media, or art galleries. Create a mood board or a Pinterest board to collect images that resonate with your desired style. Pay attention to the frame styles, colors, and arrangements that catch your eye.
Choosing Your Art
With your aesthetic in mind, you can start choosing art for your gallery wall. There are nearly unlimited ways to go about this. Focus on pieces that reflect your personality and complement the room’s style. If you need inspiration, find images of creative wall art ideas online.
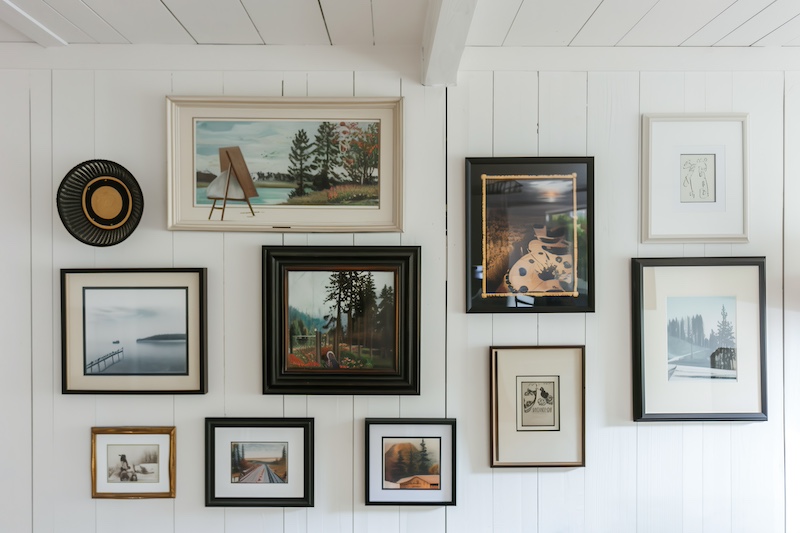
Mix and match different mediums, such as photographs, paintings, prints, or even three-dimensional objects, to create visual interest. Consider a unifying element, like a consistent color palette, theme, or frame style, to ensure cohesion.
Choose a variety of sizes and shapes to add depth, but make sure the overall arrangement feels balanced. You can also go the other way and choose an eclectic mix of art pieces, unifying them with the same frame finishes, such as sleek black frames with white mats. If you’re even more adventurous, use a blend of canvas and framed prints.
Planning Your Layout
The layout is where your gallery wall comes to life. There are a few ways you can experiment with your layout before you start putting holes in the walls:
- Lay out all your pieces on the floor to experiment with different arrangements.
- Use paper cutouts the same size as your frames and tape them to the wall as a mock-up to test spacing and configuration.
- Use tape alone to outline where you want each piece to go.
- Experiment with online tools like this gallery wall designer or MyWallDecorator.com.
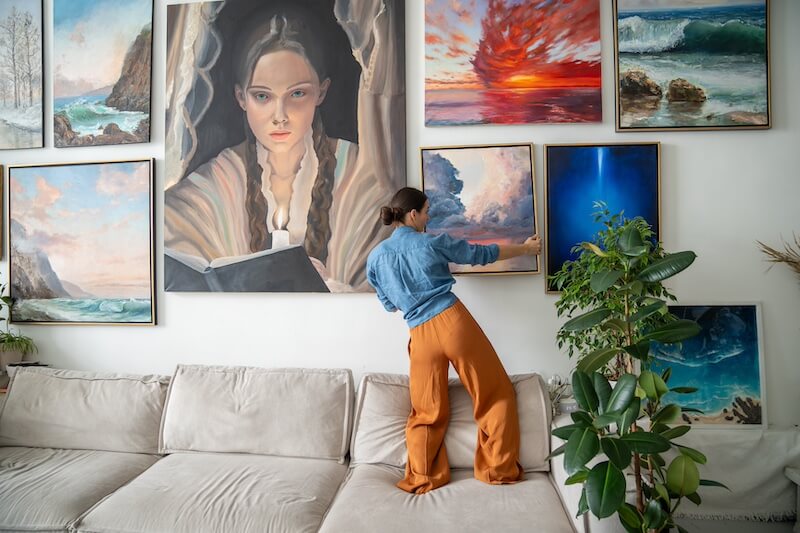
Begin with a large anchor piece in the center and build outward, keeping about three inches of space between frames for a balanced look. Mix horizontal pieces and vertical pieces to add variety, and don’t be afraid to try asymmetrical designs for a more modern vibe.
Preparing Your Wall
Before you start hanging your art, make sure your wall is ready to shine. Fill in any holes, sand down rough spots, and give the area a fresh coat of paint if needed. For ideal hanging height, keep the center of your gallery wall at eye level—about 57 inches from the floor—and use masking tape to outline the space you want to fill. This helps you visualize the layout and ensures everything looks balanced.
If you’re renting or simply don’t want to put holes in your walls, adhesive strips are your best friend. They’re the easiest option for hanging art without nails or screws.
Hanging Your Gallery Wall
Hanging your gallery wall can be a daunting task, but with a few simple steps, you can achieve a professional-looking display. Here’s a step-by-step guide to help you hang your gallery wall:
Measure & Mark the Wall
Before you start hanging your art pieces, measure the width of your wall and the distance between the pieces. Use a measuring tape to mark the spot where each piece will go, taking into account the frame size and the spacing between each piece. Masking tape can be a great tool to mark the wall and create a temporary layout.
Consider leaving your mock-up on the wall for a few days to make sure you continue to like the arrangement. Make any necessary adjustments before proceeding.
Hang Your Art Pieces
Begin with the centerpiece or the focal point of your gallery wall. Use a nail or a screw to hang the piece, making sure it is level and secure.
Work your way outward, hanging each piece according to your marked layout. Use a level to ensure that each piece is straight and level. If necessary, use a few pieces of masking tape to hold the piece in place while you adjust the nail or screw.
As you hang each piece, step back and evaluate the overall arrangement. Make any necessary adjustments to achieve a balanced and visually appealing display.
How to Fix Common Issues
It’s not uncommon to run into challenges while creating your gallery wall. If you’ve run into some challenges, here’s how to solve some of the most common problems:
- Crooked Frames: Use a leveler and double-check Command Strip placement.
- Uneven Spacing: Measure and mark spots with a pencil or masking tape before hanging.
- Artwork Too Heavy: Invest in heavy-duty wall anchors or hooks to safely secure larger pieces.
- Layout Looks Cluttered: Remove one or two frames to simplify the arrangement and add breathing room.
- Limited Wall Space: Opt for a smaller grouping or vertical layout to maximize a tight space.
Budget-Friendly Ideas
Creating a stunning gallery wall doesn’t have to break the bank. Here are some cost-effective tips:
- Thrift and DIY Frames: Look for frames at thrift stores or craft your own for a unique touch.
- Printables: Download free or inexpensive art prints online.
- Mix with Mirrors: Incorporate small mirrors to reflect light and make your space feel larger.
- Repurpose Items: Use old windows, wooden planks, or even fabric swatches as part of your display.
- Gallery Swap: Rotate pieces you already own for a fresh look without spending a dime.
Room-Specific Gallery Wall Ideas: Living Room Gallery Wall
- Living Room Gallery Wall: Use large pieces or tightly grouped framed art to create a bold focal point that covers a large area.
- Entryway Gallery: Showcase smaller pieces or a mix of art and personal mementos for a warm welcome.
- Hallway Gallery: Line up pieces with the same frame color and size for a clean, cohesive look.
- Bedroom Gallery Wall: Incorporate softer colors and personal photos for a cozy vibe.
- Dining Room Gallery Wall: Combine abstract art with vintage prints for an eclectic feel.
Theme Ideas for Gallery Walls
If you need help getting the creative juices flowing, here are a few gallery wall ideas to get you started:
- Monochromatic: Black-and-white photos or artwork for a sleek, modern look.
- Travel Memories: Maps, postcards, and photos from your adventures.
- Family Legacy: A mix of old family photos, heirlooms, and modern touches.
- Nature-Inspired: Botanical prints, landscape photos, and green color palettes.
- Pop Art: Bright, bold colors like orange and funky prints for a playful vibe.
- Vintage Charm: Antique maps, retro posters, and sepia-toned photos for a nostalgic aesthetic.
- Minimalist Geometry: Abstract prints and line art with simple shapes and clean frames for a contemporary vibe.
- Children’s Art Showcase: A playful wall featuring your kids’ creative works in colorful frames.
Make a Gallery Wall You’ll Love
Now that you’ve prepped your wall, chosen your art, and planned your layout, it’s time to bring your gallery wall to life. Combine different mediums, experiment with frame styles, and don’t forget to include personal touches that make the display truly yours. Whether it’s a collection of bold statement pieces or a mix of cherished family photos, a gallery wall is a great way to fill a large wall. Start creating your gallery wall today and enjoy the masterpiece you’ve created!